Creating (using the template) a Parent consent - camp/outdoor activity - all Sections (Y4) form in Operoo
Creation
Click on
Select the form type. In most cases you will want to use Add Parent Form.
The Y4 - Parent Advice Form - is available as an eForm template. To access it, click on the “Use one of your eForm templates” and the section will expand showing all available eForm templates. As more templates are distributed, they will automatically appear here.
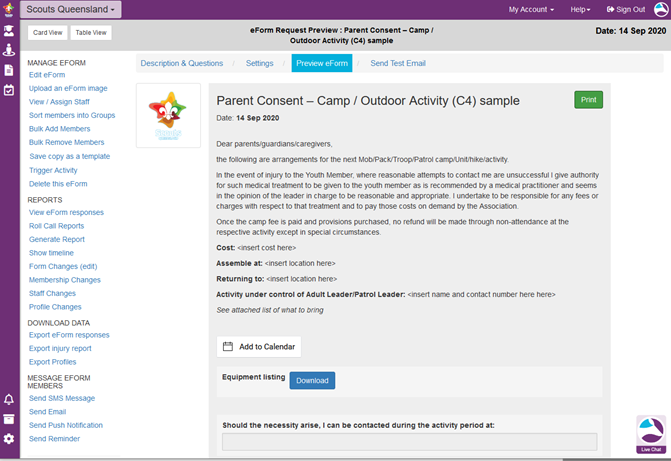
The form is created from the template and is now customisable. The fields used in the Y4 template have been setup to match as close as possible to the paper version Y4.
Additional fields
Reorder fields by dragging the field or using the green arrows to the right-hand end of the field. You can also mark a field as required by enabling the checkbox “Required?”
Member selection
This is where you assign your Members to the eForm so they will receive it and be able to respond. There are various ways of selecting members. You can either select the "Static Members" option or the Dynamic members. The "Dynamic Members" option allows you add certain criteria t
- Drag and Drop (Manual eForm) – assign only the members you drag onto the form.
- All Members (Smart eForm) - By selecting this option, all members will automatically be added to this eForm. Any newly created members will also be added.
- Linked to Groups (Smart eForm) - By selecting this option, members in all linked groups below will always be included.
- Filtered Members (Smart eForm) - By selecting this option, only members that have these specific attributes will be included.
Settings
Preview the form
Adding Profiles to the new eForm
You will now be returned to the My eForms screen, with all the eForms that you have created listed at the bottom of the screen.
To add profiles to an eForm, click the Manage Members link.
You can also search for groups, eForm or profiles by typing in the box below the heading. This search can be used to filter by name, or by group.
Enabling an eForm
Note: Only the Operoo Administrator can enable an eForm. This means that even if Staff Carers have created the content and group list, an Administrator will still have to log in and enable the eForm on his/her end before the system can send the emails to the Profile Owners (i.e., parents, members, adult participants, employees, etc.).
Once an eForm is enabled, it will immediately send emails to all profiles attached to it, so ensure that the eForm is fully completed before enabling it. It is wise to preview the eForm and send a test email to yourself before enabling the eForm.
Any profiles that are subsequently attached to an enabled eForm will be sent an email as soon as they are attached to it. In the Settings tab, you can also tick the box to “Add eForm replies to the care profile” which provides another option for viewing the responses of event participants.
Viewing participant responses
By clicking anywhere on the eForm the profiles for the participants and their response status will be displayed. A green circle with a tick means they have accepted, a yellow circle with a question mark indicates no response yet and a red circle with a cross indicates they have declined the invitation to attend.
Related Articles
Creating (without using the template) a Parent consent - camp - outdoor activity - all Sections (Y4) form in Operoo
Creating an eForm To start make sure you are logged into Operoo using your username/password combination. Navigate to the Unit (Pack). Click on the Add eForm button. Click on ‘ Add Parent Form ’ Click on ‘ Start from a blank eForm ’. You could use ...Overview and purpose of Operoo within Scouts SA
Overview and purpose of Operoo within Scouts SA On this page OVERVIEW OVERVIEW Purpose Operoo is the electronic system used by Scouts SA for enabling parents/Carers/individuals to share member health records, permission forms and contact details and ...Operoo News
For Community and Group Editions You can use Operoo’s News feature to send announcements, event notifications, school news items, reminders, newsletters, class or team information, and much more! It’s a great alternative to using email, text messages ...What is Operoo?
What is Operoo? Operoo helps Scout Groups with a duty of care go paperless, save time and be prepared for emergencies. The award winning web and mobile platform automates forms, medical records, online payments, incident reporting and approval ...Add a second parent / carer to a profile
This is a very useful feature for families with shared care arrangements, or who require both parents to have access to the Operoo profile. A Profile Owner can give another person (such as a second parent) 'View only' or 'View & Modify access'. If ...